Revit 2015 Exporting to AutoCAD DWG.
If you want to convert 3D Revit to 3D Autocad DWG, we have a simple and easy process.
Open a Revit model, click on the Application menu, Export CAD format, then select dwg from the export.
- In the CADFormats menu, click on the three dots that open as modify DWG/DXF export setup from the display dialogue box.
- Click on the Solids tab> Select ACIS solids, then click Next.
- Again, click on Next to continue.
- A dialogue box appears that define the folder that looks like a new DWG. Give an appropriate name that you like to add. Now, click on OK and proceed with the conversion.
- On the lower-left side, you would see the Revit screen that shows the status bar for the progress of the conversion. As soon as it’s done, you’ll notice a new DWG.
- Additionally, keep in mind that the Revit to DWG files conversion would make the file larger, more than 50MB Revit convert into 70MB DWG.
- Now it’s time you can edit the converted file. Also, keep a note that objects are AutoCAD solids.
We are one of the leading Australian Design and Drafting service companies that provides quality CAD Conversion services around Brisbane, Melbourne, Sydney, Perth, and Gold Coast.
The process is, first select dwg from the export. CAD Formats menu.
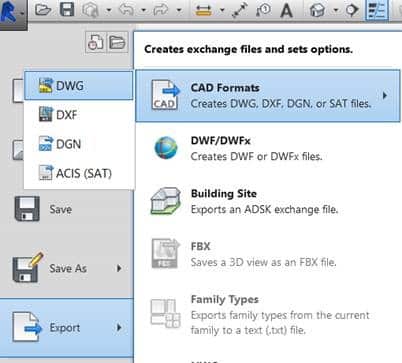
Then select the button to the right of Export Setup.

In the Dialogue box, change the load Layer Standards, to any standard you want. You also change other settings on the remaining Tabs.
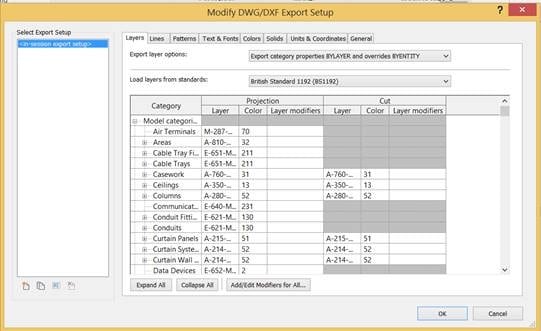
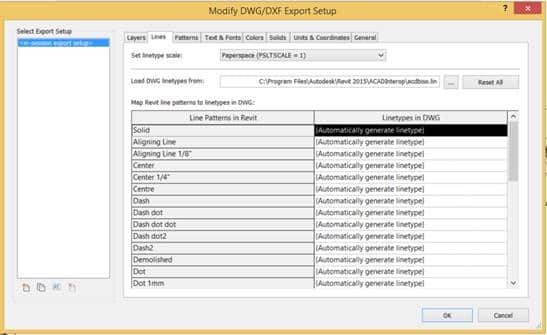
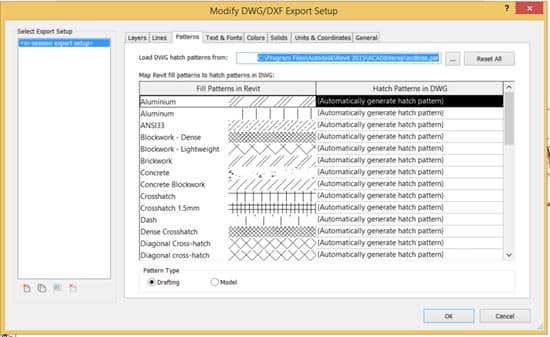
When complete select ok
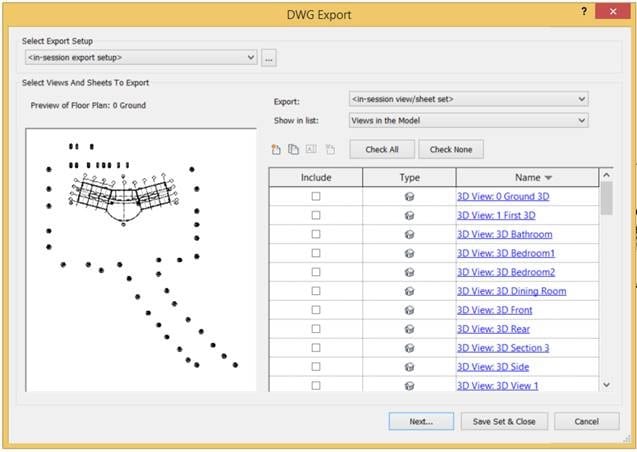
In the next dialogue box change the Export field to <in session view/sheet set> and the Show in the list to Views in Model and all the views will appear in the dialogue box so that you can select the ones you wish to export
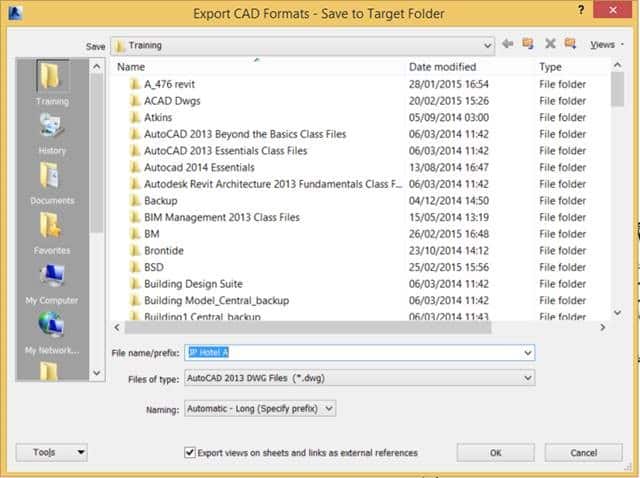
The final part of the process is to choose the location where you wish to save the DWG files and select OK
Australian Design and Drafting provides quality CAD Conversion services around Brisbane, Melbourne, Sydney, Perth, Gold Coast.
How do I export Revit layers to CAD?
Exporting Revit layers to CAD involves several steps:
Organize your Revit project: Ensure that your Revit project is properly organized with the elements you want to export placed on the appropriate layers.
Open the Revit project: Open your Revit project file.
Navigate to the Export Settings: In Revit, go to the “File” menu and select “Export” > “CAD Formats” > “DWG” or “DXF” depending on your preference.
Adjust Export Settings: In the export dialog box, adjust the export settings according to your requirements. This includes selecting the version of CAD format, specifying the export units, setting up layers, etc.
Layer Mapping: Revit allows you to map Revit categories to specific layers in the CAD file during export. You can customize these mappings to ensure that the elements in Revit are exported to the correct layers in the CAD file.
Export: Once you have configured the export settings and layer mappings, click the “OK” or “Export” button to begin the export process.
Save the CAD File: Choose a location and filename for the exported CAD file and save it.
Review the Exported CAD File: Open the exported CAD file in your CAD software to verify that the layers and elements have been exported correctly.
Can you convert a Revit file to AutoCAD?
Yes, you can convert a Revit file to AutoCAD by exporting it to a DWG (AutoCAD Drawing) or DXF (Drawing Exchange Format) file format. Here’s how you can do it:
Open your Revit project: Launch Revit and open the project file that you want to convert to AutoCAD.
Navigate to the Export Settings: In Revit, go to the “File” menu and select “Export” > “CAD Formats” > “DWG” or “DXF” depending on your preference.
Adjust Export Settings: In the export dialog box, adjust the export settings according to your requirements. This includes selecting the version of CAD format, specifying the export units, setting up layers, etc.
Layer Mapping: Revit allows you to map Revit categories to specific layers in the CAD file during export. You can customize these mappings to ensure that the elements in Revit are exported to the correct layers in the CAD file.
Export: Once you have configured the export settings and layer mappings, click the “OK” or “Export” button to begin the export process.
Save the CAD File: Choose a location and filename for the exported CAD file and save it.
Review the Exported CAD File: Open the exported CAD file in AutoCAD or any other CAD software that supports DWG or DXF formats to verify that the conversion was successful.
