
Paper Sketches to 3D Models – I’ve heard troubling talk over the use of sketches as a viable form of pre-design planning, and I’ve seen several experts, whose talent I respect greatly, make proclamations that performing a hand sketch prior to earnest software-based design work is a waste of time and energy.
The consensus seems to be that if you have the time to put pen to paper and sketch out a model, then you have time to sit down at your workstation, open up your CAD program, and start modeling correctly. I disagree. I think sketching out your ideas initially is a smart use of time.
First of all, it’s faster and easier than doing the same thing in software. Well, let me qualify that, it’s easier for me – maybe there are some hardcore CAD users out there who can model faster than I can sketch, but I don’t see how.
Paper Sketch to 3D Model
etching out a model before I start drawing lines in CAD helps me get the get a proper mental picture of whatever it is I’m modeling. As I sketch, I can flip the object around freely in my mind – and I know there’s no one out there who can CAD faster than I can think! This helps me out a lot when it comes time to actually start building the object in software, since I’ve already got a series of snapshots lined up in my head.
Also, one other thing… I hate to try and romanticize my work, but isn’t this exactly why we started doing 3D modeling in the first place? Speaking for myself, the process of taking an object from my imagination and seeing it through the entire modeling process, seeing it come to life, and then actually holding a finished model in my hand is a rush. I still remember the first thing I drafted – it was just some architectural widget that I’ll probably never see again, but I was amazed that I could actually hold in my hand something that had sprung from my imagination.
Paper Sketch to 3D Model Service for industries
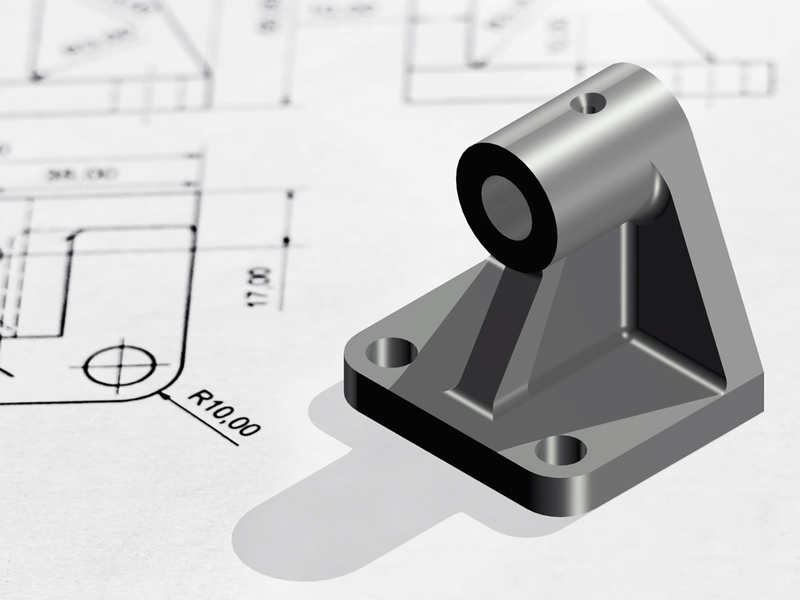
Providing a “Paper Sketch to 3D Model Service” for industries can be a highly valuable offering, as it can bridge the gap between traditional design processes and modern computer-aided design (CAD) technologies. This service would involve transforming hand-drawn sketches or 2D drawings into detailed and accurate 3D models that can be used for prototyping, visualization, manufacturing, and more.
Here’s how such a service might function:
- Submission of Sketches: Clients from various industries (e.g., manufacturing, architecture, product design) can submit their hand-drawn sketches or 2D drawings to your service. This can be done through a web portal or email.
- Consultation and Clarification: To ensure accuracy and clarity, your team may engage in consultations with the clients to understand their requirements better. During this stage, any ambiguities in the sketches can be clarified.
- CAD Conversion: After the initial consultation, your team of skilled CAD designers and engineers will convert the 2D sketches into 3D models. The choice of CAD software may vary depending on the complexity of the project and the industry-specific requirements.
- Iterative Process: Feedback is crucial in this service. You should offer the clients the opportunity to review the initial 3D models and provide feedback for improvements or adjustments. Iterative revisions may be necessary to fine-tune the design.
- Quality Control: Thorough quality control checks should be performed at various stages to ensure that the final 3D models are accurate, complete, and match the client’s expectations.
- Delivery of 3D Models: Once the 3D models are approved, they can be delivered to the clients in their preferred format, such as STL (stereolithography) for 3D printing, STEP (Standard for the Exchange of Product model data) for manufacturing, or other industry-specific formats.
- Optional Services: To add value to the service, you can offer additional features, such as rendering the 3D models for visualization purposes, creating assembly instructions, or integrating the models into virtual or augmented reality environments.
- Data Security and Confidentiality: Since industries might be dealing with proprietary designs and sensitive information, ensuring data security and confidentiality is of utmost importance. Implement robust security measures to protect client data.
- Pricing Model: Define a transparent and competitive pricing model based on factors like project complexity, turnaround time, and additional services requested.
- Customer Support: Provide responsive customer support to address any queries or issues that clients might have during and after the project.
To market your “Paper Sketch to 3D Model Service,” reach out to potential clients in various industries, attend trade shows and conferences, create a user-friendly website to showcase your expertise, and consider offering trial projects to showcase the quality of your work.
Remember that accuracy, efficiency, and creativity are crucial in providing this service, as industries will be relying on your 3D models for their product development and manufacturing processes.
Paper Sketches to 3D Models Service
To me, sketching is the first part of that realization process, and the process of moving something out of my imagination and into reality is the entire reason I fell in love with 3D modeling.
MY position is that there are many designers who still respect the purity – even the artistry – of professional 3D modeling, and I happen to be one of them.
Contact Australian Design & Drafting for Paper
Sketch to 3D Model service…
Can I convert 2D drawing to 3D model?
Yes, you can convert a 2D drawing into a 3D model using various software tools designed for computer-aided design (CAD) and 3D modeling. Here’s a general process you can follow:
Choose a Software: There are many software options available for 3D modeling, such as AutoCAD, SolidWorks, Blender, SketchUp, and many others. Choose one that fits your needs and skill level.
Import the 2D Drawing: Most software allows you to import 2D drawings in common formats like .jpg, .png, .svg, or .pdf. Once imported, you can use it as a reference to create your 3D model.
Trace or Extrude: Depending on the complexity of your drawing, you may need to manually trace the outlines of the drawing in 3D space or use tools like extrusion to create 3D shapes from the 2D lines.
Add Depth and Detail: Once you have the basic shapes in place, you can add depth and detail to your model by extruding, chamfering, filleting, or using other modeling techniques available in your chosen software.
Refine and Edit: Continuously refine and edit your model until you achieve the desired result. This may involve tweaking dimensions, adjusting shapes, or adding additional features.
Export the 3D Model: Once you’re satisfied with your 3D model, export it in a format suitable for your intended use, such as .obj, .stl, or .fbx.
Optional: Rendering and Visualization: If you want to create realistic images or animations of your 3D model, you can use rendering software to add materials, lighting, and textures.
Can you 3D print from a sketch?
Yes, you can 3D print from a sketch. In fact, many 3D printing workflows start with a sketch or a digital design. Here’s a general process for turning a sketch into a 3D printed object:
Create or Import the Sketch: Start by creating a sketch of the object you want to 3D print. You can do this using traditional methods like drawing on paper or digitally using drawing software. Alternatively, you can use CAD software to create a digital sketch directly.
Convert Sketch to 3D Model: Once you have your sketch, you’ll need to convert it into a 3D model. This typically involves tracing or extruding the sketch to create a three-dimensional representation of the object. You can do this manually using CAD software or by using specialized tools that can convert 2D sketches into 3D models.
Refine the 3D Model: After creating the basic 3D model from your sketch, you may need to refine it to ensure that it’s suitable for 3D printing. This might involve adjusting dimensions, smoothing surfaces, or adding additional details.
Prepare for 3D Printing: Once your 3D model is finalized, you’ll need to prepare it for 3D printing. This involves tasks such as checking for errors, setting the appropriate size and orientation for printing, and adding support structures if necessary.
Export the 3D Model: After preparing the model, export it in a file format that is compatible with your 3D printer. Common file formats for 3D printing include .stl, .obj, and .3mf.
Print the Object: Load the exported 3D model file into your 3D printer’s slicing software, which generates the instructions (G-code) for the printer. Follow the instructions to set up your printer, load the filament, and start the printing process.
Post-Processing: After the object is 3D printed, you may need to perform post-processing steps such as removing support structures, sanding rough surfaces, or applying finishes to achieve the desired final appearance.